Executive Summary
Learn and Train Your Team on the Run:
As a developer, an architect and team lead, sometimes you have to learn a new
technology and all its jargons and buzzwords in a very short time. Not to mention,
that I am supposed to create a training material for new comers to Android and
possibly Java.
The best way to learn anything is by doing it. In short, just start a new project
and have a rough architect and design and start coding.
Why did I choose Android as my start?
Well, Java is my backyard, Android is developed in Java plus I have been an End-to-End architect-developer for over
15 years. Therefore, my plan is to develop Java-Android first and then the other mobile technologies
and gadgets would not be too hard to master.
What is my goal in this page?
The goal is to create (for remote clients) an easy introduction to Learning,
Thinking and Developing Android-Java Apps. There are a great number of documents,
code and help on the web, but getting the overall picture was not easy. The attempt
here is to create a training material for technical, nontechnical (wants to know),
new comers to Android and experienced Java audience. To make life easier, our
attempt is to ease into the Android world by covering the following:
|
�
|
Look at the system from a 2000 foot view
|
|
�
|
Identify the components and communication
|
|
�
|
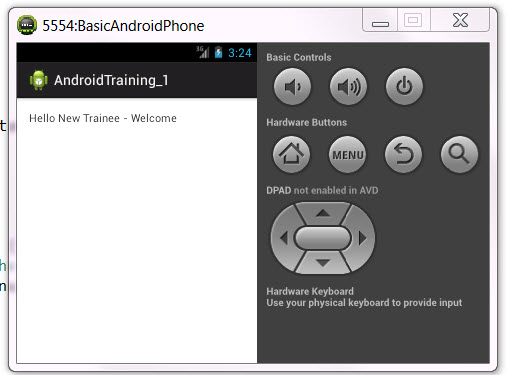
Developing "Hello New Trainee - Welcome" app (statically and dynamically)
|
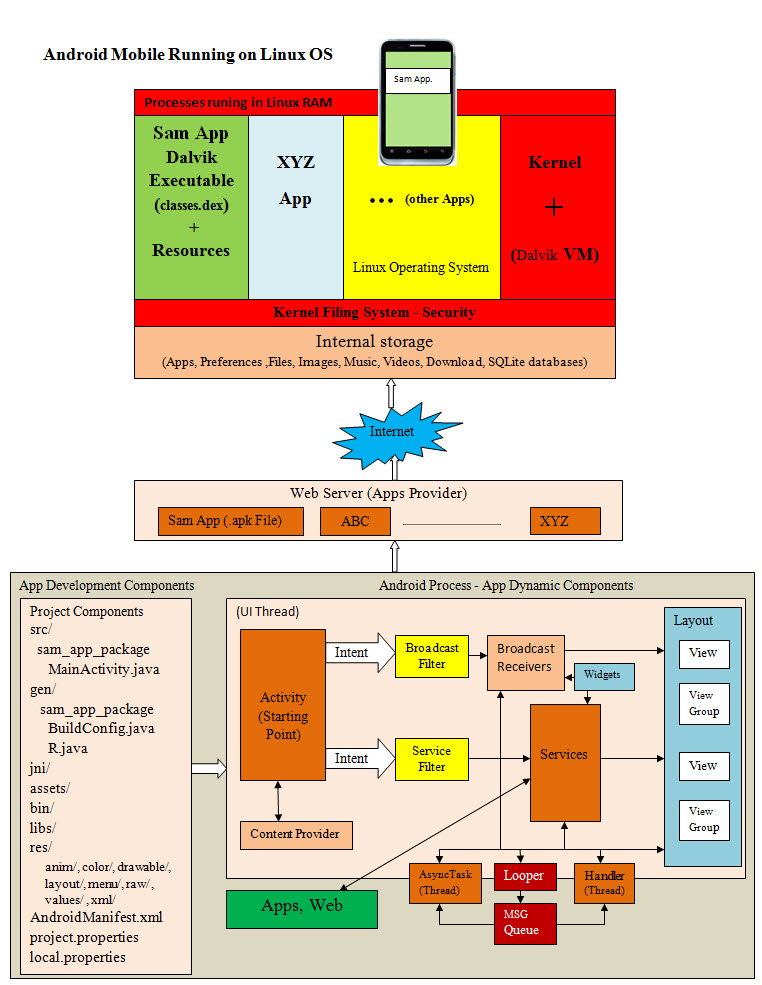
The starting diagram is to present the basics of an Android mobile
and its background. The diagram has three parts (more details follows):
|
�
|
Running an App on Android Mobile:
The first part of the diagram is the operating system (called Linux) runs an App called
Sam App in one process (with all app's code and resources) among many other processes
including Linux itself and its helper the Dalvik Virtual Machine (VM).
|
|
�
|
Deployment (Getting an App):
Any Android user can download a copy of an app from a web server (Apps provider) to their mobile then store and use it.
|
|
�
|
Manufacturing an Android App (technical but short) using Java:
This is a picture of the project folder structure and a rough presentation of the User Interface Thread
and other threads and how the major components of Android app would start and communicate.
|
|
Quick Explanation to our Nontechnical Audience:
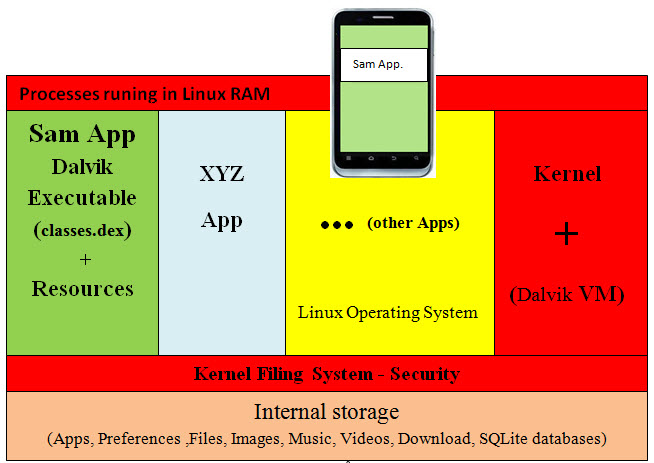
What is running in the background of an Android mobile?
Any Android app (Sam App) running on an Android mobile is called a process. Each process
has a specified segment of the mobile's main memory to run in it. This memory
segment has the app code (classes.dex) and resources (files, images, music, etc) needed to
make an app work promptly. Linux is the Operating System for Android mobile and
it is controlled by its main program known as the Kernel (the boss). The
Kernel with the help of another program, Dalvik Virtual Machine (VM) run the
apps. A Mobile has internal storage that stores the Apps, Preferences (data
and what to do with it), Files, Images, Music, Videos, Download, SQLite
databases. The Kernel manages the internal storage access by giving processes
restricted permission to access internal storage.
Folder Structure, Components and Communication:
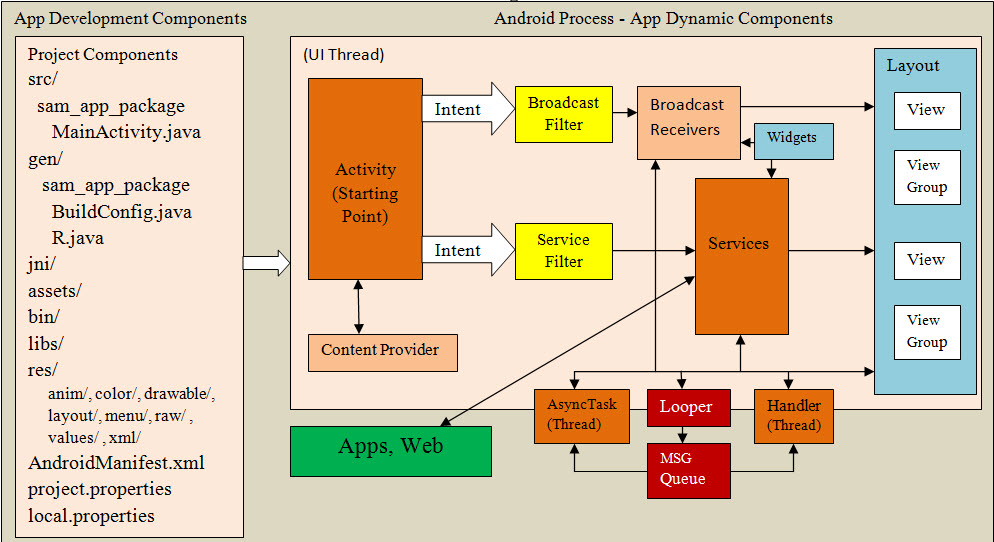
Folder Structure:
Examining the Android folder structure would help Java professionals compare it with
the familiar-standard Java structure which most of them had worked with.
The following list of new folders and files need special attention:
gen, jni, assets, res (sub folders),
MainActivity.java, BuildingConfig.java, R.java,
AndroidManifest.xml
Such examination of the new folders and files may bring out the curiosity, the anxiety
and the urge to know. These files and folders require a new way of thinking and approaches. We will
cover each in the next sections.
Dynamic Components and Communication:
The image has three threads, User Interface (UI), Handler and AsyncTaks plus Looper. The
UI is the main thread where everything is running inside it. It should be noted that
every app has only one screen with possible multiple views. The goal is to present a view
in the app's screen, which is controlled by the layout. The layout is composed of Views
(TextView, ImageView, KeyboardView, ...), View Groups and buttons, and communicates back
and forth between other components. It also communicate with other threads.
The starting point of any app is the Activity (MainActivity.java) and it communicates its requests to three components:
� Services (equivalent Business Objects - services)
� BroadcastReceiver (equivalent to the listener in swing or AWT)
� ContentProvider (equivalent to Database Adapter)
Communication is both ways, and it mostly uses message (Intent) objects and possible filter(s)
to communicate with Services and BroadcastReceiver, but no Intent or a filter are needed when
communicating with ContentProvider.
An app cannot call another app or the web directly, but it must call a service to start another app.
AsyncTask enables proper and easy use of the UI thread. This class allows to perform background
operations and publish results on the UI thread without having to manipulate threads and/or handlers.
A Handler allows you to send and process Messages and Runnable objects associated with a thread's
MessageQueue. Each Handler instance is associated with a single thread and that thread's message queue.
The Looper class maintains a MessageQueue, which contains a list of messages. An important
character of Looper is that it's associated with the thread within which the Looper is created.
App Widgets are miniature application views that can be embedded in other applications (such as the Home screen) and receive periodic updates.
Developing "Hello New Trainee - Welcome" app (statically and dynamically):
My approach to developing "Hello New Trainee - Welcome" app is to start from the app (.pak file)
back to the Java code. The reason for that is the analogy of building a car, where you
start with the building of the transmission, the cooling system-radiator and so on,
by the time you get to power windows, you are totally lost and do not know which goes
with what. It is better to start with the car and disassemble into smaller
parts and then assemble into a car and in our case an app.
An Android package, or apk, is the container for an Android app�s resources and
executables. It�s a zipped file that contains simply the following:
|
�
|
AndroidManifest.xml:
Serialized, non human readable - the static app map to the Operating System.
|
|
�
|
classes.dex:
Dalvik executable
|
|
�
|
res/:
Images, sound files. ..etc.
|
|
�
|
lib/:
Help with executable such as Native Development Kit (NDK).
These are are mostly 3rd party Android apps currently running in a Dalvik virtual machine.
Native code in C and/or C++.
|
|
�
|
META-INF/:
Application�s signature
|
classes.dex:
In this example, we have the Android SDK installed using Eclipse plus
the ADT plugin installed (version 21.0.0 or higher).
We used Eclipse - Android Developer Tools and created the following:
|
�
|
Project:
AndroidTraining_1
|
|
�
|
Package:
com.sameldin.androidtraining_1
|
classes.dex is basically the Java classes converted into the Dalvik executable and zipped into classes.dex file.
What is classes.dex composed off?
There are two ways to find out:
Disassembler (baksmali)
Examining "C:\Users\sameldin\workspace\AndroidTraining_1\bin" Folders
Disassembler (baksmali):
By using a decoder (not sure if it is legal) and go "baksmali" and then "smali"
to assemble. Disassembler (baksmali) into smaller parts and then assembler (smali)
into an app.
The names "smali" and "baksmali" are the Icelandic equivalents
of "assembler" and "disassembler" respectively.
Examining "C:\Users\sameldin\workspace\AndroidTraining_1\bin" Folders:
Looking at the workspace and its contents, it has the following folders:
C:\Users\sameldin\workspace\AndroidTraining_1\bin\dexedLibs
C:\Users\sameldin\workspace\AndroidTraining_1\src\com\sameldin\androidtraining_1
First Folder:
C:\Users\sameldin\workspace\AndroidTraining_1\bin\dexedLibs
This folder has the following file, that we used pkzip to check it and it has the following files, see its unzipped content:
android-support-v4-b1988445d3bcd9b07ca6acc93b88cdfb.jar

Manifest.mf file has:
Manifest-Version: 1.0
Dex-Location: classes.dex
Created-By: 1.6.0_26 (Sun Microsystems Inc.) + dx 1.7
The second folder has the following content - see the table:
C:\Users\sameldin\workspace\AndroidTraining_1\bin\classes\com\sameldin\androidtraining_1
|
Java Classes
|
Inner Classes
|
Comments
|
|
Sam_MainActivity.class
|
|
This is the java class that we created which extends Activity class.
|
|
BuildConfig.class
|
|
Automatically generated file by IDT . DO NOT MODIFY
|
|
R.class
|
|
AUTO-GENERATED FILE. DO NOT MODIFY.
This class was automatically generated by the aapt tool from the resource data it found.
It should not be modified by hand.
|
|
|
R$attr.class
|
AUTO-GENERATED FILE. DO NOT MODIFY.
|
|
|
R$dimen.class
|
Default screen margins, per the Android Design guidelines.
|
|
|
R$drawable.class
|
Draw-able resources IDs
|
|
|
R$id.class
|
List of IDs
|
|
|
R$layout.class
|
Layout constants
|
|
|
R$menu.class
|
Menus ID
|
|
|
R$string.class
|
String and their Ids
|
|
|
R$style.class
|
Base application theme, dependent on API level.
|
|
Looking at the Java classes in the above table, there three Java classes:
Sam_MainActivity.class
BuildConfig.class
R.class
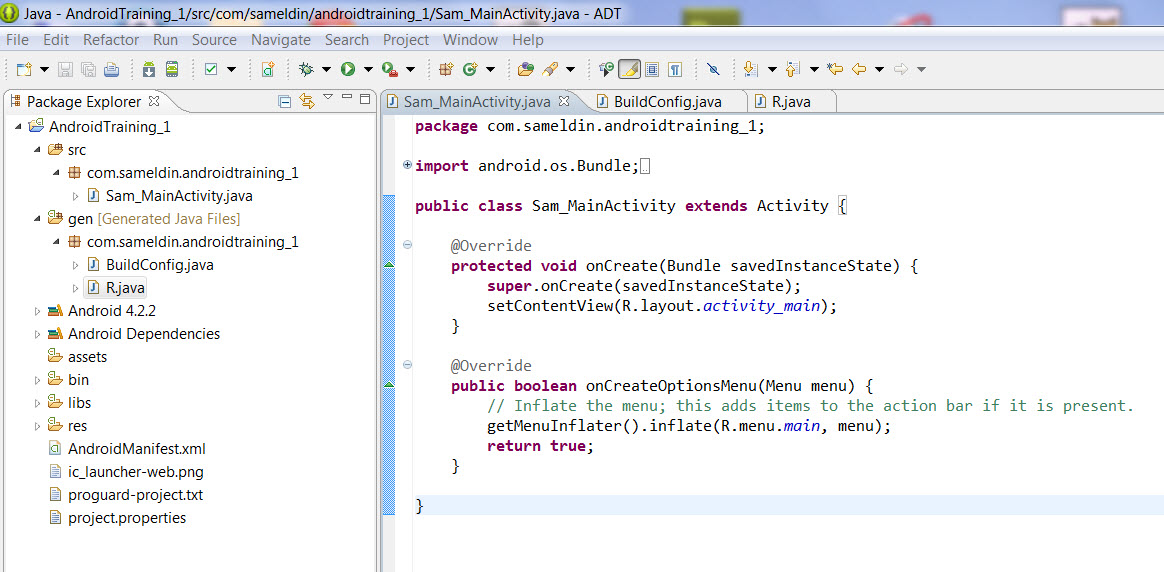
Examining "AndroidTraining_1" project folder structure image, these Java classes are located under two different folder:
src/
gen/
Under the source "src" folder, the Java class created by the developer and that is Sam Eldin (me):
Sam_MainActivity.class
Under generated [Java Generated Files] "gen":
BuildConfig.class
R.class
These classes were create by the ADT or the system and we are not supposed to change them which
we will explain later.
As for the Sam_MainActivity.class, it is a simple example where
Sam_MainActivity extends Activity, override onCreate(Bundle savedInstanceState) and
onCreateOptionsMenu(Menu menu). We will cover that later also.
As for BuildConfig.class and R.class (with its inner classes) these were generated by the system (ADT).
The Java R.class and "res\values\strings.xml" file:
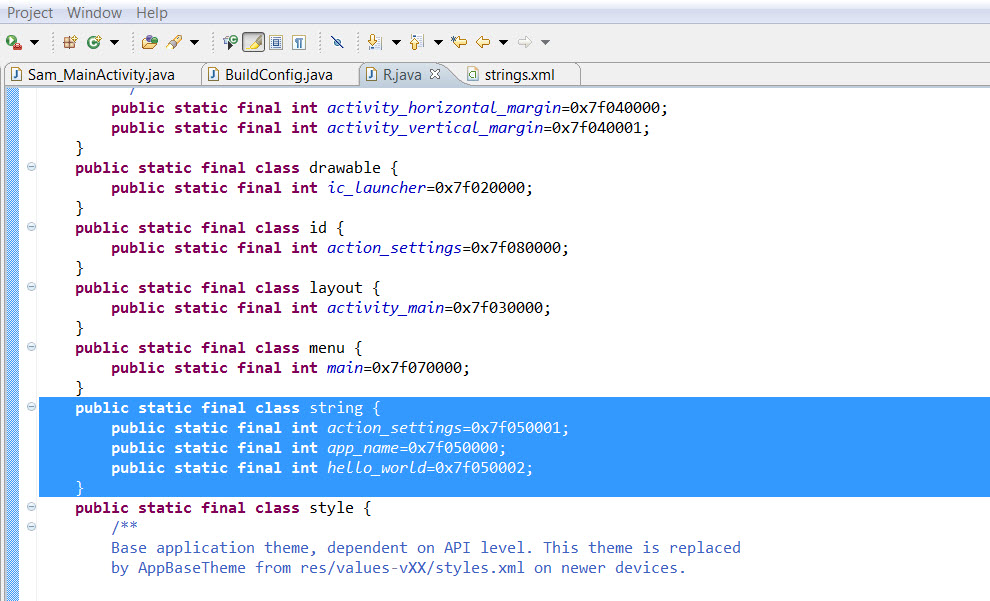
The strings are located in the "res\values\strings.xml" file:
<string name="app_name">AndroidTraining_1</string>
<string name="action_settings">Settings</string>
<string name="hello_world">Hello New Trainee - Welcome</string>
Each string has a unique name, a value and an ID and the ID is created in the inner class R$string.class by the system as we mention for tracking resources.
The same thing goes for every resource such as the following and every resource is
located in an xml file which has a corresponding inner $class that is coded within the
R.class by the system:
res/
anim/ my_animation.xml
color/ my_color_item.xml
drawable/ myImage.jpeg
layout/activity_main.xml
menu/ main.xml
raw/ MyOGG.ogg, MyMP3.mp3
values/dimens.xml
strings.xml
styles.xml
xml/ my_preference_screen.xml
As for BuildConfig.class, it is a system generated class and its contents is shown in the image.
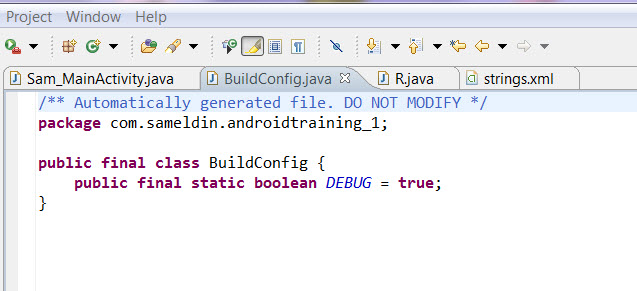
In conclusion, R.class is a system generated Java class to track resources of any type.
Mapping Java Code and XML files:
At this point, we have broken down the.apk file into the following:
Mainfest.xml
Java classes - code
XML files - resources.
We need to cover these files' functionality and relationship. Our attempt with following
table is briefly cover these files' functionality and relationship.
|
File name
|
Functionality
|
Comments
|
|
AndroidManifest.xml
|
App mapping to the Android system
|
The manifest presents essential information about the application to the Android system.
It is the information the system must have before it can run any of the application's code.
It has the needed information about the app components and housekeeping.
|
|
Sam_MainActivity.class
|
Developer code for the dynamic control of an app.
|
Activity is the starting point of an app and has the Java code which may
include any layout components (widgets, buttons, text input fields, etc)
to be displayed. Each Activity is associated with one screen (with multiple
layouts). It communicates with Services, Content providers and Broadcast receivers.
|
|
layout/activity_main.xml
|
A layout defines the visual structure for a user interface.
|
A layout resource defines the architecture (template) for the UI in an Activity or a component.
It is a type of resource that defines what is drawn on the screen (Linear Layout, Relative Layout, Table Layout, Grid View, Tab Layout, List View).
Layout resources are stored as XML files in the /res/layout resource directory for the application.
Your application can create View and ViewGroup objects (and manipulate their properties)
programmatically in the Actvivty class.
|
|
menu/main.xml
|
Menus are a common user interface component in many types of applications.
|
menu, item (MenuItem), group are the primary collection of menu items for an activity.
It's where you should place actions that have a global impact on the app, such
as "Search," "Compose email," and "Settings."
|
|
values/dimens.xml
|
XML resource that carries a dimension value (with a unit of measure).
|
A dimension value is defined in XML. A dimension is specified with a number followed
by a unit of measure. For example: 10px, 2in, 5sp. The following units of measure
are supported by Android:
Density-independent Pixels (dp):
An abstract unit that is based on the physical density of the screen.
Scale-independent Pixels (sp):
This is like the dp unit, but it is also scaled by the user's font size preference.
Points (pt):
1/72 of an inch based on the physical size of the screen.
Pixels (px):
Corresponds to actual pixels on the screen.
Millimeters (mm):
Based on the physical size of the screen.
Inches (in):
Based on the physical size of the screen.
|
|
values/strings.xml
|
strings can be used as resources to be used within the app.
|
String resources (String or an array of strings) can be defined in
the /res/values/strings.xml file. You may define a string resource entry
for each string used by your application.
|
|
values/styles.xml
|
Styles define the look and feel of Android application.
A theme is a style applied to an entire Activity or application.
|
A style is a collection of properties that specify the look and format
for a View or a window. A style can specify properties such as height,
padding, font color, font size, background color, and much more. A style
is defined in an XML resource that is separate from the XML that specifies the layout.
The theme system defines the default attributes for each View. The attributes
are used by the View to do the actual on-screen rendering. Such attributes include
text styles, text colors, background Drawable, and so on.
To reference a style attribute, the name syntax is almost identical to the normal
resource format, but instead of the at-symbol (@), use a question-mark (?), and the
resource type portion is optional.
|
|
AndroidManifest.xml:
Every application must have an AndroidManifest.xml file (with precisely that name) in
its root directory. The manifest presents essential information about the application
to the Android system, information the system must have before it can run any of the
application's code. The following image has the AndroidManifest.xml for our "AndroidTraining_1"
project. We will attempt to cover each of the XML tags.
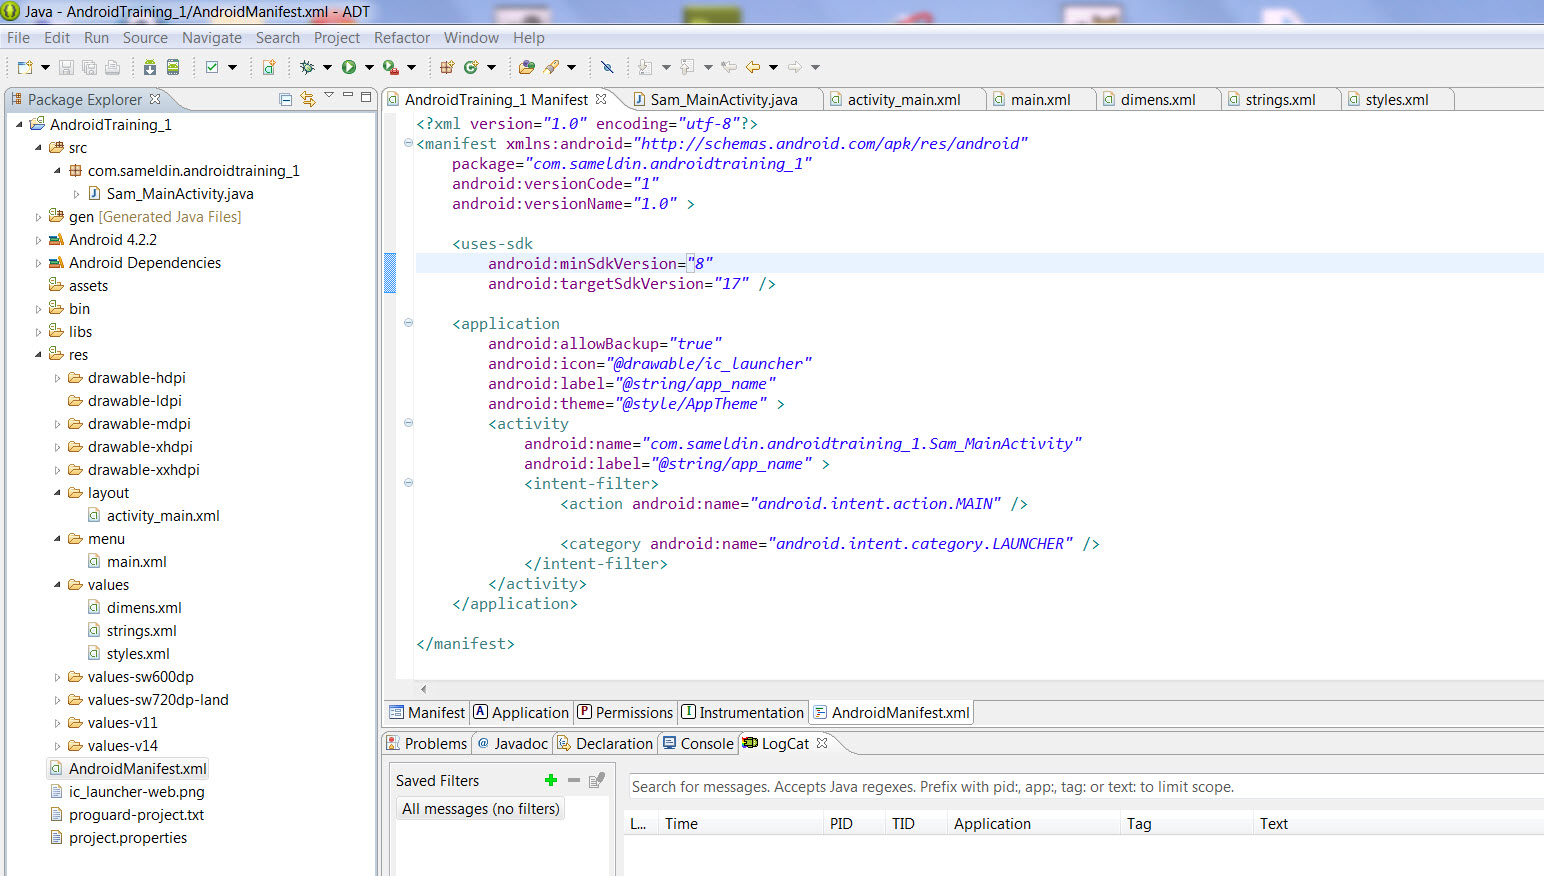
Only the <manifest> and <application> elements are:
Required
They each must be present and can occur only once.
Most of the others can occur many times or not at all � although at least some of them must
be present for the manifest to accomplish anything meaningful.
If an element contains anything at all, it contains other elements. All values are set
through attributes, not as character data within an element.
Elements at the same level are generally not ordered. For example, <activity>,
<provider>, and <service> elements can be intermixed in any sequence.
An <activity-alias> element is the exception to this rule: It must follow
the <activity> it is an alias for.
manifest Tag:
<manifest xmlns:android="http://schemas.android.com/apk/res/android"
package="com.sameldin.androidtraining_1"
android:versionCode="1"
android:versionName="1.0" >
"xmlns:android":
Defines the Android namespace. This attribute should always be set to "http://schemas.android.com/apk/res/android".
"package":
A full Java-language-style package name for the application. The name should be unique. The name
may contain uppercase or lowercase letters ('A' through 'Z'), numbers, and underscores ('_').
However, individual package name parts may only start with letters.
To avoid conflicts with other developers, you should use Internet domain ownership as the basis
for your package names (in reverse). For example, applications published by Google start with
com.google. You should also never use the com.example namespace when publishing your applications.
"android:versionCode":
An internal version number. This number is used only to determine whether one version is more
recent than another, with higher numbers indicating more recent versions. This is not the
version number shown to users; that number is set by the versionName attribute.
The value must be set as an integer, such as "100". You can define it however you want,
as long as each successive version has a higher number. For example, it could be a build number. Or
you could translate a version number in "x.y" format to an integer by encoding the "x" and "y"
separately in the lower and upper 16 bits. Or you could simply increase the number by one each
time a new version is released.
"android:versionName":
The version number shown to users. This attribute can be set as a raw string or as
a reference to a string resource. The string has no other purpose than to be displayed
to users. The versionCode attribute holds the significant version number used internally.
uses-sdk Tag:
The application's compatibility with one or more versions of the Android platform,
by means of an API Level integer - in the XML "uses-sdk" tag:
<uses-sdk
android:minSdkVersion="8"
android:targetSdkVersion="17" >
"<uses-sdk":
Specify the API Level, not the version number of the SDK (software development kit) or Android platform.
"android:minSdkVersion":
An integer designating the minimum API Level required for the application to run.
"android:targetSdkVersion" :
An integer designating the API Level that the application targets. If not set, the default value equals that given to minSdkVersion.
application Tag:
<application
android:allowBackup="true"
android:icon="@drawable/ic_launcher"
android:label="@string/app_name"
android:theme="@style/AppTheme" >
"android:allowBackup":
The name of the class that implement's the application's backup agent, a subclass of
BackupAgent. The attribute value should be a fully qualified class name (such
as, "com.example.project.MyBackupAgent"). However, as a shorthand, if the first
character of the name is a period (for example, ".MyBackupAgent"), it is appended
to the package name specified in the <manifest> element.
There is no default. The name must be specified.
"android:icon":
An icon for the application as whole, and the default icon for each of the
application's components.
This attribute must be set as a reference to a drawable resource containing
the image (for example "@drawable/icon"). There is no default icon.
"android:label":
A user-readable label for the application as a whole, and a default label for each of the application's components.
The label should be set as a reference to a string resource, so that it can be localized like
other strings in the user interface. However, as a convenience while you're developing the
application, it can also be set as a raw string.
"android:theme":
A reference to a style resource defining a default theme for all activities
in the application. Individual activities can override the default by setting
their own theme attributes.
activity Tag:
<activity
android:name="com.sameldin.androidtraining_1.Sam_MainActivity"
android:label="@string/app_name" >
An "activity" can contain <intent-filter> and <meta-data>
An activity (an Activity subclass) that implements part of the application's visual user interface.
All activities must be represented by <activity> elements in the manifest file. Any that
are not declared there will not be seen by the system and will never be run.
"android:name":
The name of the class that implements the activity, a subclass of Activity. The attribute value
should be a fully qualified class name (such as, "com.example.project.MyActivity"). However,
as a shorthand, if the first character of the name is a period (for example, ".MyActivity"),
it is appended to the package name specified in the <manifest> element.
Once you publish your application, you should not change this name (unless you've set android:exported="false").
There is no default. The name must be specified.
Using the Period ".":
If the first character of the string is a period "." , the string is appended to the application's package
name (as specified by the <manifest> element's package attribute).
"." = means the current package
"android:label":
A user-readable label for the activity. The label is displayed on-screen when the activity must
be represented to the user. It's often displayed along with the activity icon.
If this attribute is not set, the label set for the application as a whole is used instead.
The activity's label � whether set here or by the <application> element � is also the
default label for all the activity's intent filters. The label should be set as a reference to a string resource,
so that it can be localized like other strings in the user interface. However, as a convenience
while you're developing the application, it can also be set as a raw string - Hard Coding the Label.
android:label="This android:label is Hardcoded" >
intent-filter Tag:
contained in:
<activity>
<activity-alias>
<service>
<receiver>
It must contain (subelement):
<action>
It can contain (subelements):
<category>
<data>
Description:
An Intent is an asynchronous message which allow Android components to request functionality
from other components of the Android system. An Intent can be used to signal to the Android
system that a certain event has occurred. Other components in Android can register to this
event via an intent filter.
What are Intents Filter?
Most of the contents of the filter are described by Intent's subelements:
<action>
<category>
<data>
Intent's subelements specify the types of intents that an activity, service, or broadcast receiver can respond to.
Therefore, an intent filter declares the capabilities of its parent component:
An activity
A Service
Types of broadcasts a receiver can handle
Explicit Intents:
Explicit intents designate the target component by its name (the component name
field, mentioned earlier, has a value set). Since component names would generally
not be known to developers of other applications, explicit intents are typically
used for application-internal messages � such as an activity starting a subordinate
service or launching a sister activity.
Implicit Intents:
Implicit intents do not name a target (the field for the component name is blank). Implicit
intents are often used to activate components in other applications.
action Tag:
<action android:name="android.intent.action.MAIN" />
// explicit
The Android public class "Intent" (declaration) has defined a number of public static final Strings such as "ACTION_MAIN" which is declared as follows:
public static final String ACTION_MAIN
Added in API level 1 Activity Action: Start as a main entry point, does not expect to receive data.
Input: nothing
Output: nothing
Constant Value: "android.intent.action.MAIN"
The android:name="android.intent.action.MAIN" translates that action to Start
as a main entry point, does not expect to receive data.
It adds an action to an intent filter. An <intent-filter> element must contain one or
more <action> elements. If it doesn't contain any, no Intent objects will get through the filter.
category Tag:
<category android:name="android.intent.category.LAUNCHER" />
// explicit
A string containing additional information about the kind of component that should handle
the intent. Any number of category descriptions can be placed in an Intent object. As it
does for actions, the Intent class defines several category constants, the following is one of the "Category":
CATEGORY_LAUNCHER
The activity can be the initial activity of a task and is listed in the top-level application launcher.
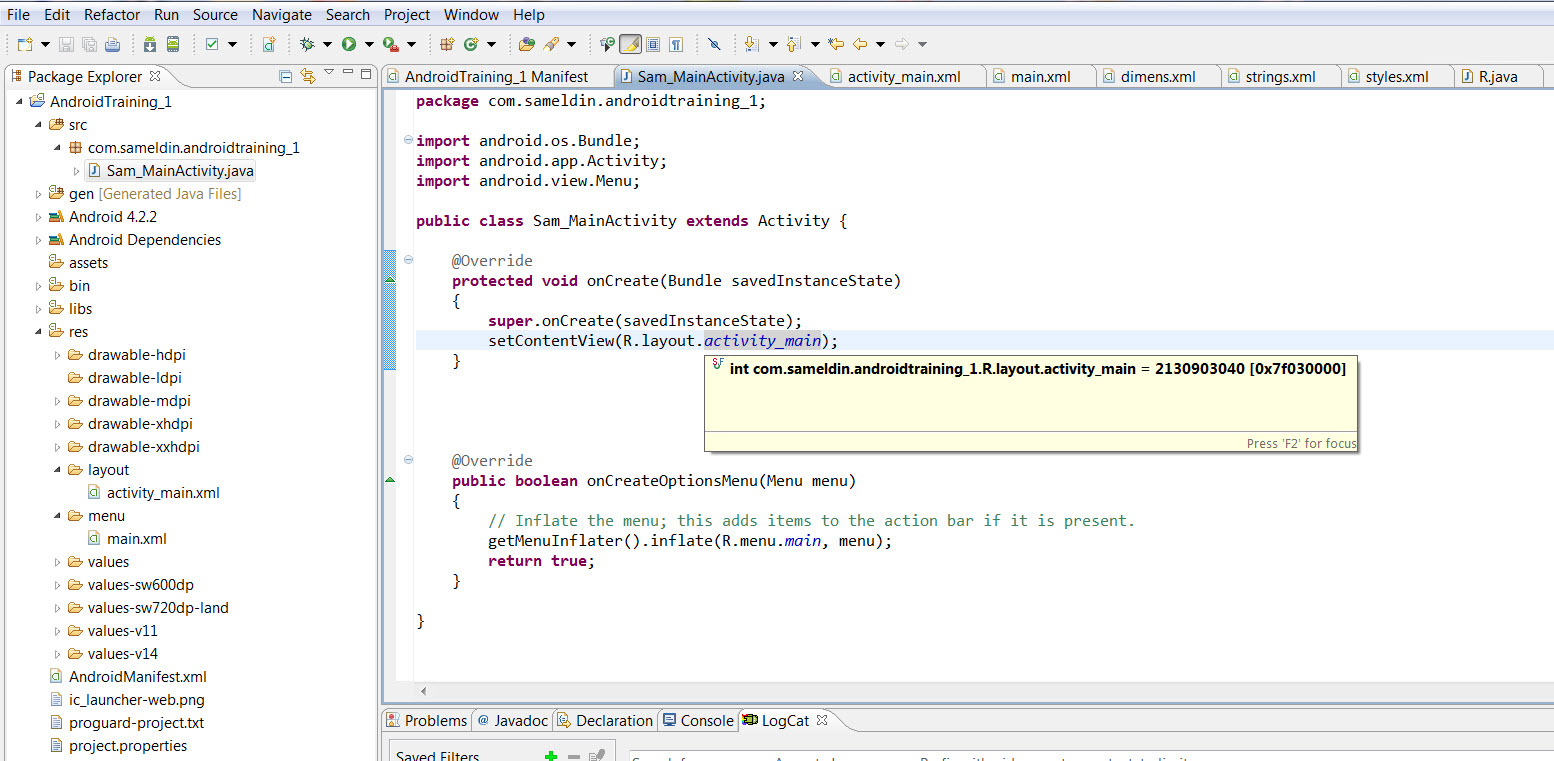
In inclusion, the " AndroidManifest.xml" is instructing Linux Kernel and Dalvik Virtual Machine (VM)
to run the application by launching the activity named "com.sameldin.androidtraining_1.Sam_MainActivity"
as Main action. The starting point is defined in the Sam_MainActivity class, where it overwritten the methods:
@Override
protected void onCreate(Bundle savedInstanceState)
{
super.onCreate(savedInstanceState);
setContentView(R.layout.activity_main);
}
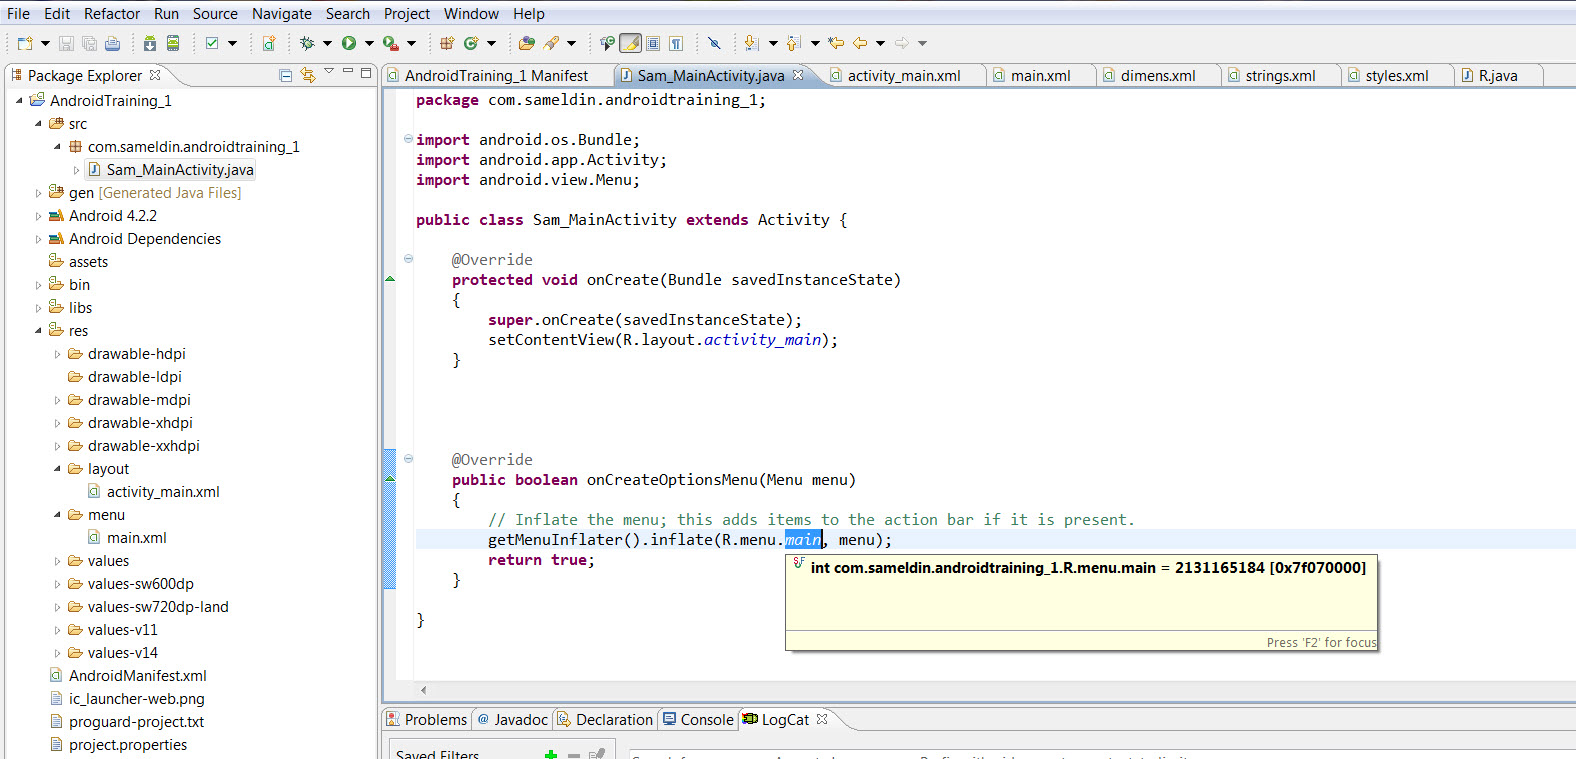
@Override
public boolean onCreateOptionsMenu(Menu menu)
{
// Inflate the menu; this adds items to the action bar if it is present.
getMenuInflater().inflate(R.menu.main, menu);
return true;
}
The resources for these methods are located in the R.class and the following resources:
res/layout/activity_main.xml
res/menu/main.xml
The following two images has the Eclipse ADT with Java code and resources.
 res/values/dimens.xml
:
<resources>
<!-- Default screen margins, per the Android Design guidelines. -->
<dimen name="activity_horizontal_margin">16dp</dimen>
<dimen name="activity_vertical_margin">16dp</dimen>
</resources>
The "dimens.xml" file has the common dimensions to use for various screen elements that are defining for Android.
name="activity_horizontal_margin" = 16dp
name="activity_vertical_margin" = 16dp
Both vertical and horizontal margin are defined as Density-independent Pixels (DP).
Density-independent Pixels - an abstract unit that is based on the physical density
of the screen. These units are relative to a 160 dpi screen, so one dp is one pixel
on a 160 dpi screen. The ratio of dp-to-pixel will change with the screen density, but
not necessarily in direct proportion.
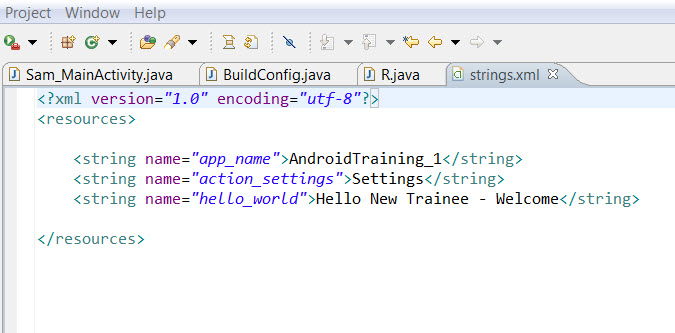
res/values/strings.xml:
<?xml version="1.0" encoding="utf-8"?>
<resources>
<string name="app_name">AndroidTraining_1</string>
<string name="action_settings">Settings</string>
<string name="hello_world">Hello New Trainee - Welcome</string>
</resources>
A string resource provides text strings for your application with optional text styling and formatting.
There are three types of resources that can provide your application with strings:
String:
XML resource that provides a single string.
String Array:
XML resource that provides an array of strings.
Quantity Strings (Plurals):
XML resource that carries different strings for pluralization.
All strings are capable of applying some styling markup and formatting
res/values/styles.xml:
<resources>
<!--
Base application theme, dependent on API level. This theme is replaced
by AppBaseTheme from res/values-vXX/styles.xml on newer devices.
-->
<style name="AppBaseTheme" parent="android:Theme.Light">
<!--
Theme customizations available in newer API levels can go in
res/values-vXX/styles.xml, while customizations related to
backward-compatibility can go here.
-->
</style>
<!-- Application theme. -->
<style name="AppTheme" parent="AppBaseTheme">
<!-- All customizations that are NOT specific to a particular API-level can go here. -->
</style>
</resources>
A style is a collection of properties that specify the look and format for a View
or window. A style can specify properties such as height, padding, font color, font
size, background color, and much more. A style is defined in an XML resource that is
separate from the XML that specifies the layout.
Styles in Android share a similar philosophy to cascading stylesheets in web
design�they allow you to separate the design from the content.
Question-Mark (?):
The question-mark "?" indicates that we're referencing a resource value in the currently loaded theme (styles.xml).
In our example, we do not have a theme, but the following is a quick example of using "?":
<EditText id="text"
android:layout_width="fill_parent"
android:layout_height="wrap_content"
android:textColor="?android:textColorSecondary"
android:text="@string/hello_world" />
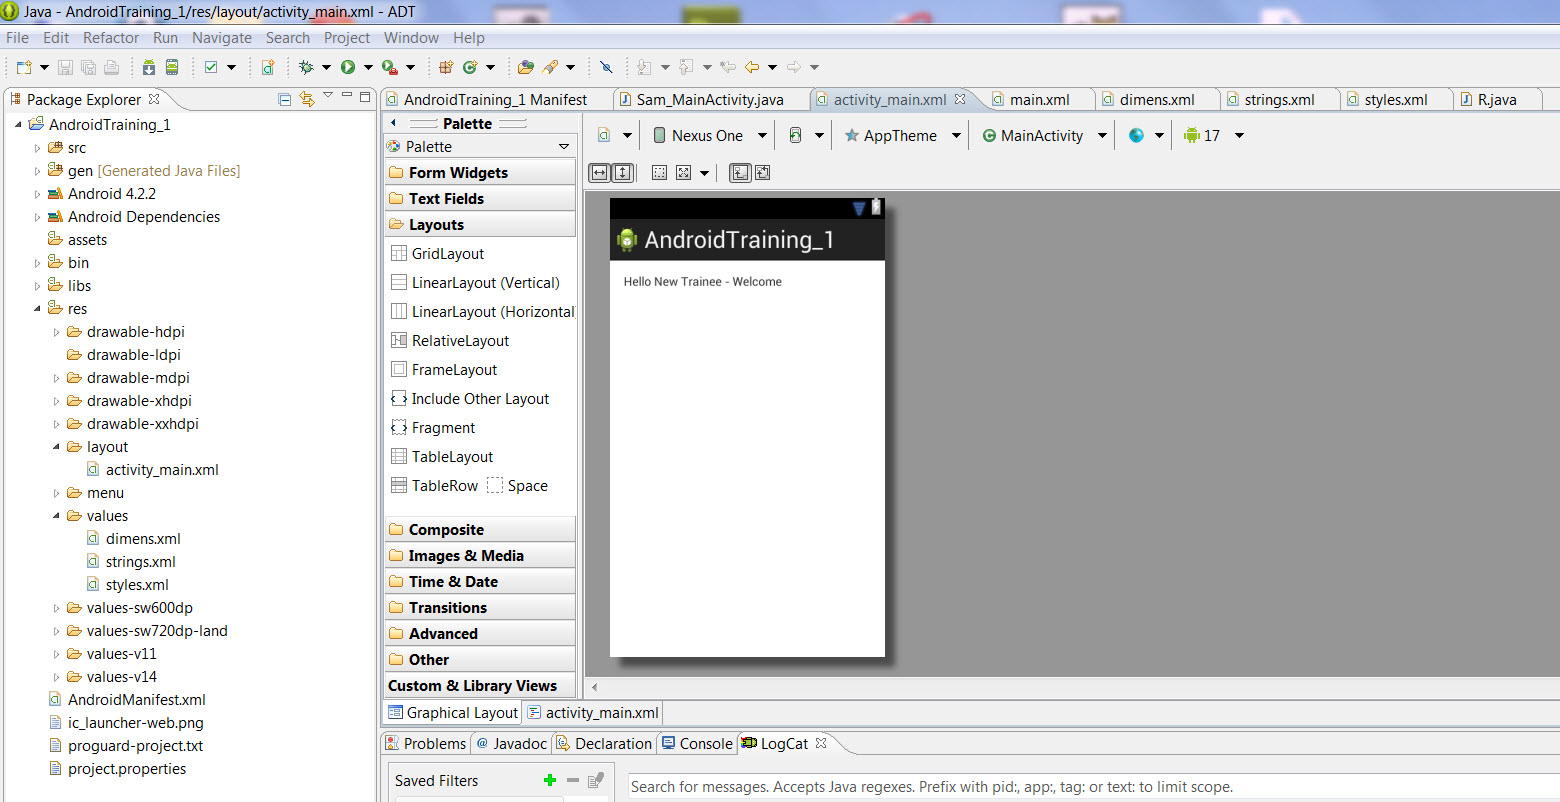
res/layout/activity_main.xml:
Before we starting covering Res/layout/activity_main.xml, the reader should be familiar
with dimens.xml, strings.xml and stypes.xml, since the acitivity_main.xml will be
referring to these resource files.
What Is A Layout?
A Layout is a type of resource that defines what is drawn on the screen. Layout resources are stored
as XML files in the /res/layout resource directory for the application. A layout resource
is simply a template for a user interface screen, or portion of a screen.
The layouts are as follows:
1. Linear Layout
2. Relative Layout
3. Table Layout
4. Grid View
5. Tab Layout
6. List View
7. Web View
Looking at the content of the res/layout/activity_main.xml and try to make sense out of it.
It has "RelativeLayout" with a "TextView".
The following image is the Graphical Layout of the Res/layout/activity_main.xml in the Eclipse ADT.
<RelativeLayout xmlns:android="http://schemas.android.com/apk/res/android"
xmlns:tools="http://schemas.android.com/tools"
android:layout_width="match_parent"
android:layout_height="match_parent"
android:paddingBottom="@dimen/activity_vertical_margin"
android:paddingLeft="@dimen/activity_horizontal_margin"
android:paddingRight="@dimen/activity_horizontal_margin"
android:paddingTop="@dimen/activity_vertical_margin"
tools:context=".Sam_MainActivity" >
<TextView
android:layout_width="wrap_content"
android:layout_height="wrap_content"
android:text="@string/hello_world" />
</RelativeLayout>
xmlns:android="http://schemas.android.com/apk/res/android":
Defines the Android namespace. This attribute should always be set to "http://schemas.android.com/apk/res/android".
xmlns:tools="http://schemas.android.com/tools"
Defines the Android namespace. This attribute should always be set to "http://schemas.android.com/tools".
android:layout_width="match_parent"
android:layout_height="match_parent"
Width and Height: "match_parent" (also known as "fill_parent" before API level 8) makes the component expand to match the size of its parent view.
android:paddingBottom="@dimen/activity_vertical_margin"
android:paddingLeft="@dimen/activity_horizontal_margin"
android:paddingRight="@dimen/activity_horizontal_margin"
android:paddingTop="@dimen/activity_vertical_margin"
padding: this is set in the "@dimen.xml" file. to be name="activity_horizontal_margin" = 16dp and name="activity_vertical_margin" = 16dp.
tools:context=".Sam_MainActivity"
"." = the default package, "Sam_MainActivity.class" has the context.
android:layout_width="wrap_content"
width: "wrap_content", the width or height of the view is set to the minimum size necessary to fit the content within that view.
android:layout_height="wrap_content"
height: "wrap_content", the width or height of the view is set to the minimum size necessary to fit the content within that view.
android:text="@string/hello_world"
Defined in the res/values/strings.xml file as:
<string name="hello_world">Hello New Trainee - Welcome</string>
res/menu/main.xml:
Menus are a common user interface component in many types of applications.
A Menu is a container for menu items.
A <menu> element must be the root node for the file and can hold one or more elements:
<item>:
Creates a MenuItem, which represents a single item in a menu. This element may contain a nested <menu> element in order to create a submenu.
<group>:
An optional, invisible container for <item> elements. It allows you to categorize menu items so
they share properties such as active state and visibility.
The following code is the content of the "res/menu/main.xml":
<menu xmlns:android="http://schemas.android.com/apk/res/android" >
<item
android:id="@+id/action_settings"
android:orderInCategory="100"
android:showAsAction="never"
android:title="@string/action_settings"/>
</menu>
android:id="@+id/action_settings"
A resource ID that's unique to the item, which allows the application can recognize the item when the user selects it.
android:orderInCategory="100"
Integer. The default order of the items within the category.
android:showAsAction="never"
Specifies when and how this item should appear as an action item in the action bar.
The following keywords are what the "showAsAction" would present:
"ifRoom":
Only place this item in the Action Bar if there is room for it.
"withText":
Also include the title text (defined by android:title) with the action item. You can include this value along with one of the others as a flag set, by separating them with a pipe |.
"never":
Never place this item in the Action Bar.
"always":
Always place this item in the Action Bar. Avoid using this unless it's critical that the item always appear in the action bar. Setting multiple items to always appear as action items can result in them overlapping with other UI in the action bar.
"collapseActionView":
The action view associated with this action item (as declared by android:actionLayout or android:actionViewClass) is collapsible.
Introduced in API Level 14.
android:title="@string/action_settings"
A reference to a string to use as the item's title.
The "@" and Plus Sign "+":
The at-symbol (@) at the beginning of the string indicates that the XML parser should
parse and expand the rest of the ID string and identify it as an ID resource.
The plus-symbol (+) means that this is a new resource name that must be created
and added to our resources (in the R.java file). There are a number of other ID resources
that are offered by the Android framework. When referencing an Android resource ID, you do
not need the plus-symbol, but must add the android package namespace. The following is an example:
android:text="@string/hello_world"
What is next?
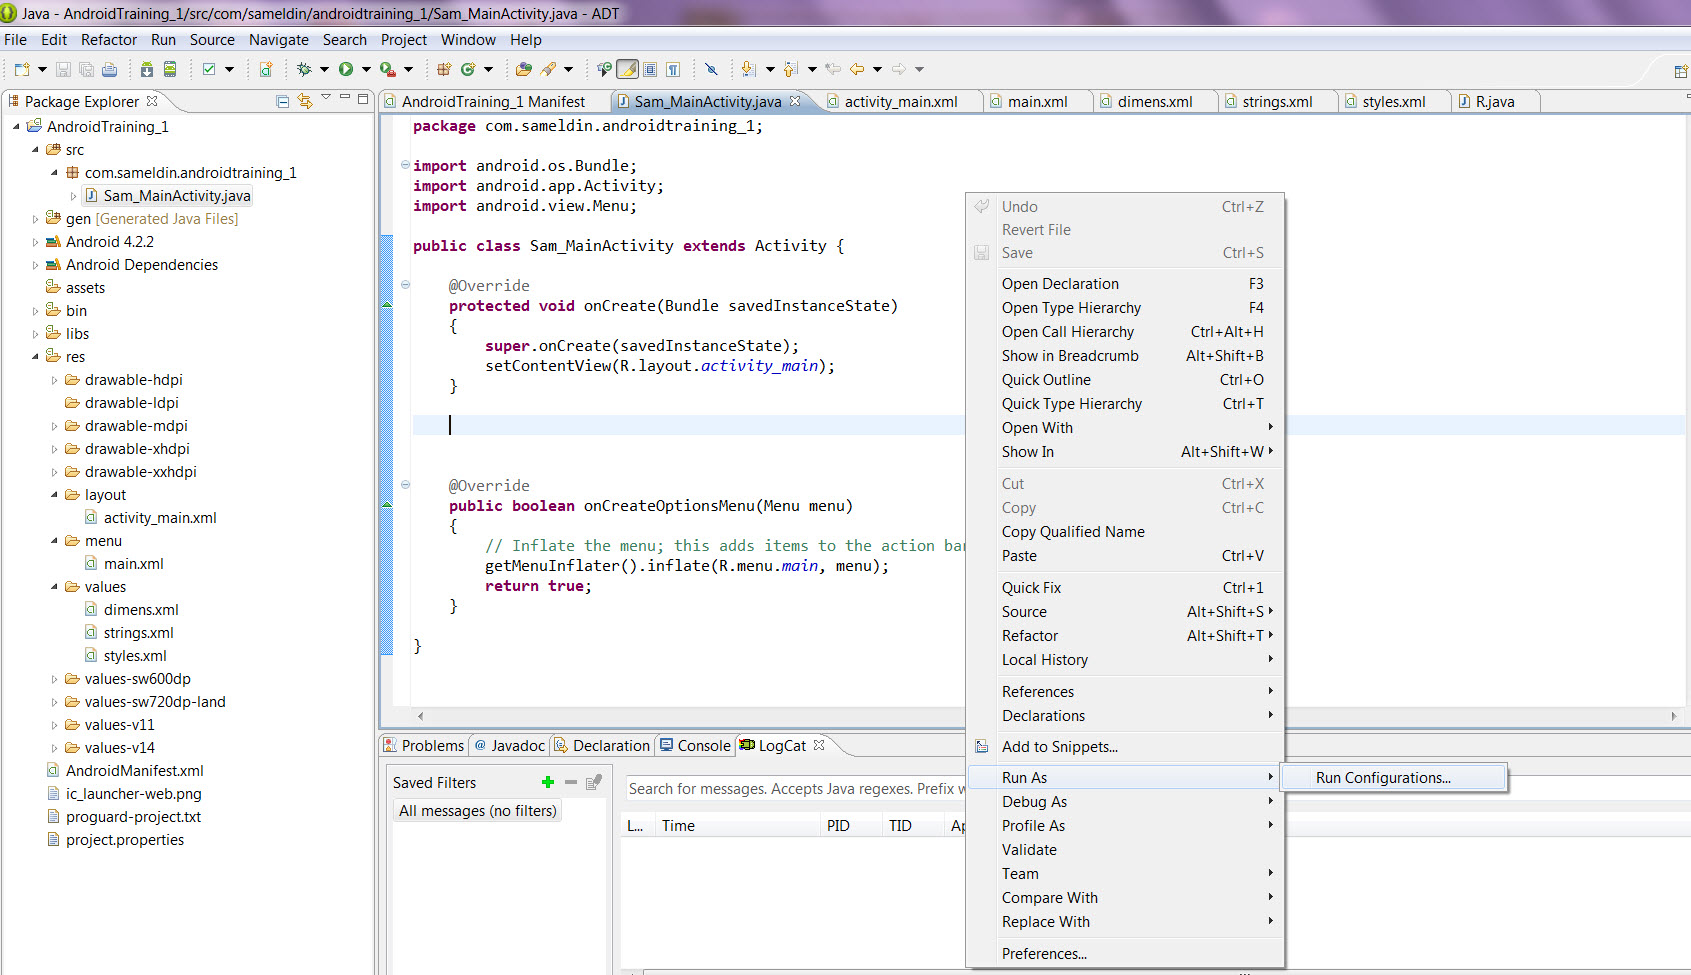
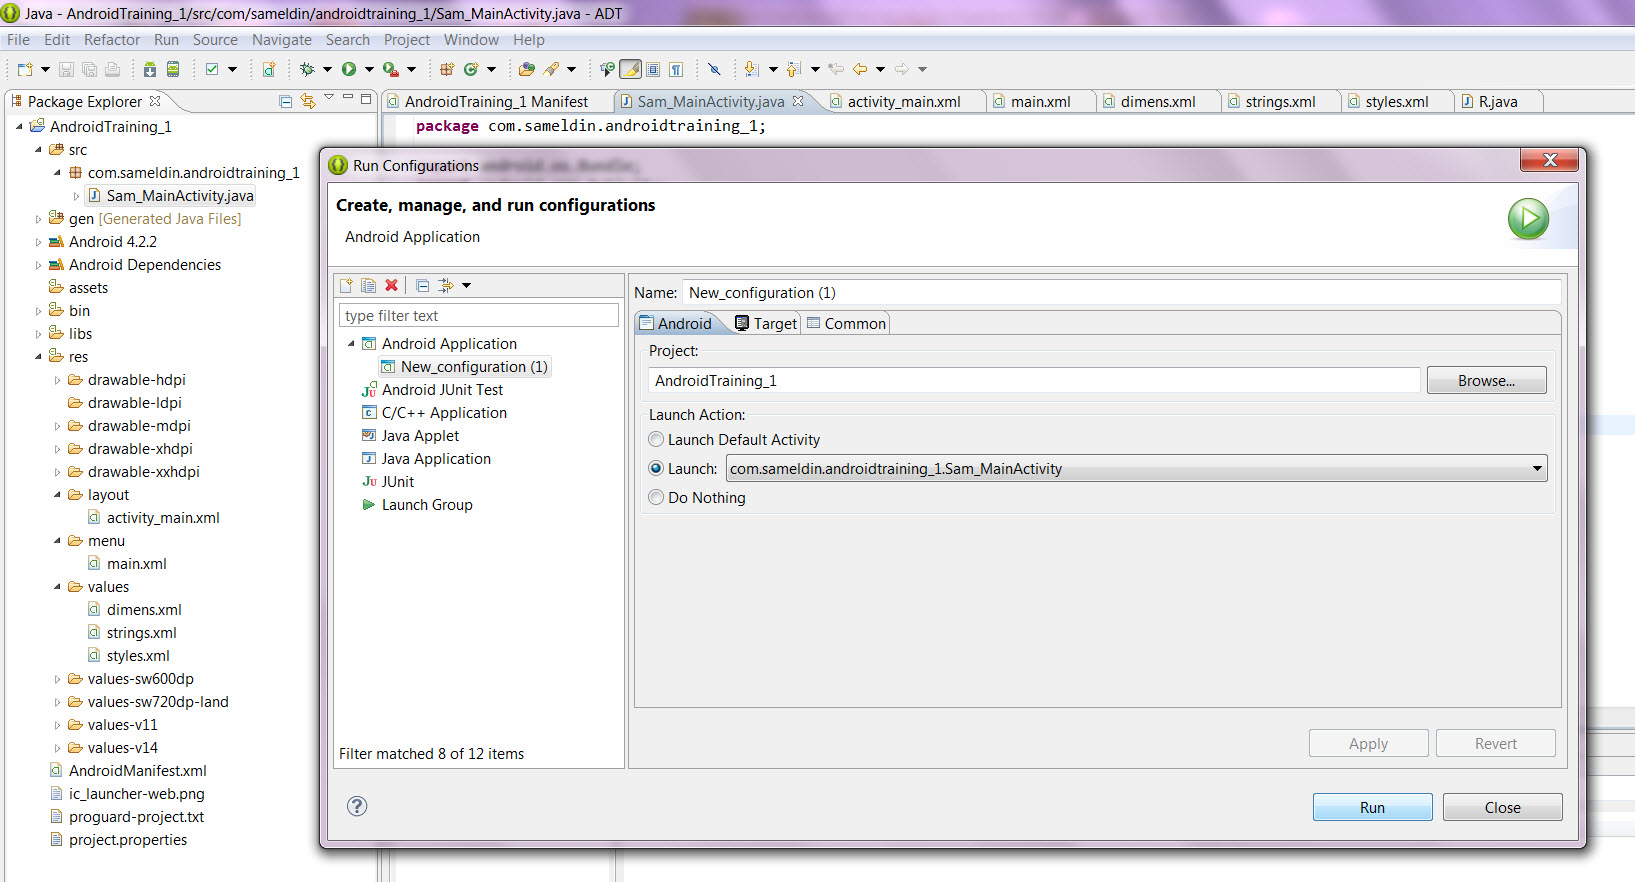
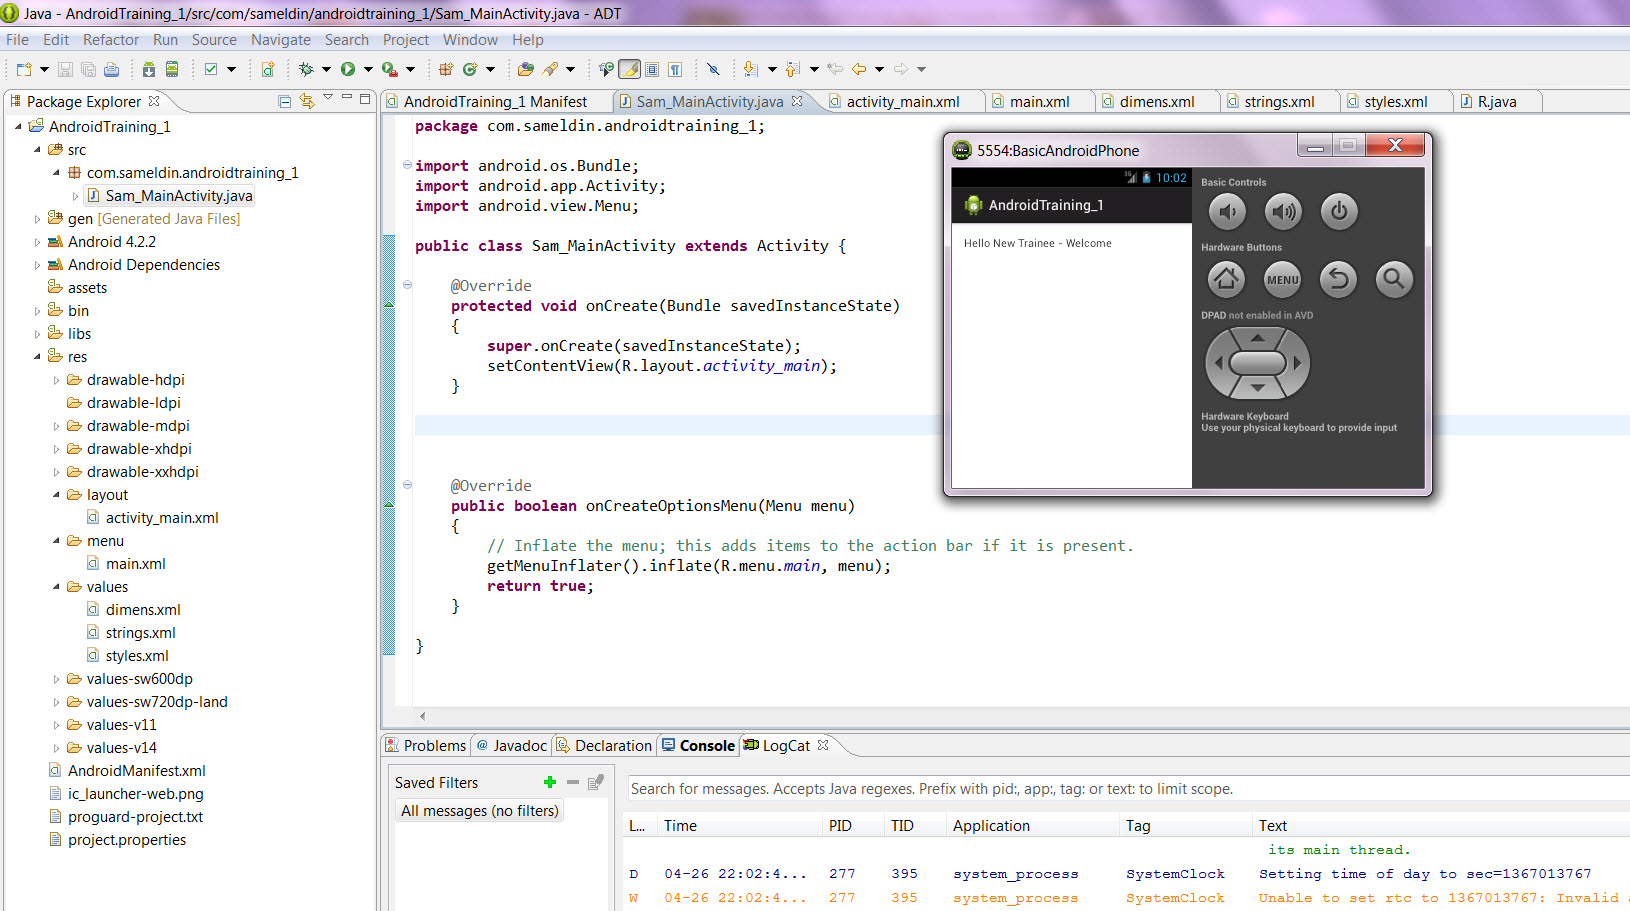
Now it is time to put all the code and xml files into action and run the app on the Eclipse ADT.
The next images are basically running the AndroidTraining_1 in the Eclipse ADT.
By right clicking of the mouse in the Sam_MainActivity class, then run the Configuration
by lunching the com.samledin.androidtraining_1.Sam_MainActivity then the Android app
will run as shown in the running app image.
 Working with res/layout/activity_main.xml and res/values/strings.xml
:
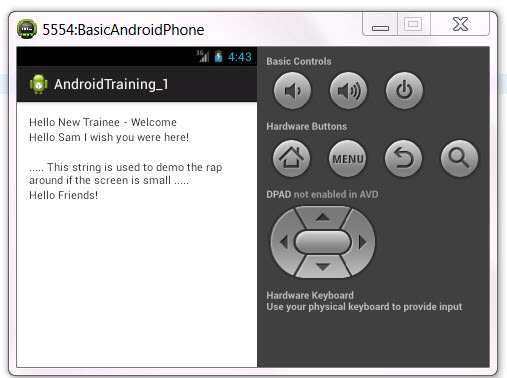
We need to demo how you can add more strings to app screen using layout and strings xml files.
What do need to do to turn the app in image on left to look like the app in the image on the right.
|
|
Turn
This
to
That
|
|
|
We need to examine the res/layout/activity_main.xml and res/values/strings.xml and what changes do we do that help with new TextViews.
<RelativeLayout xmlns:android="http://schemas.android.com/apk/res/android"
xmlns:tools="http://schemas.android.com/tools"
android:layout_width="match_parent"
android:layout_height="match_parent"
android:paddingBottom="@dimen/activity_vertical_margin"
android:paddingLeft="@dimen/activity_horizontal_margin"
android:paddingRight="@dimen/activity_horizontal_margin"
android:paddingTop="@dimen/activity_vertical_margin"
tools:context=".Sam_MainActivity" >
<!-- We added an ID to the TextView so we can work with. -->
<TextView
android:id="@+id/textView_line_1"
android:layout_width="wrap_content"
android:layout_height="wrap_content"
android:text="@string/hello_world" />
<!-- We added the following TextViews. -->
<TextView
android:id="@+id/textView_line_2"
android:layout_width="wrap_content"
android:layout_height="wrap_content"
android:layout_below="@+id/textView_line_1"
android:text="@string/hello_sam" />
<TextView
android:id="@+id/textView_line_3"
android:layout_width="wrap_content"
android:layout_height="wrap_content"
android:layout_alignLeft="@+id/textView_line_1"
android:layout_below="@+id/textView_line_2"
android:text="@string/blank_Line" />
<TextView
android:id="@+id/textView_line_4"
android:layout_width="wrap_content"
android:layout_height="wrap_content"
android:layout_alignLeft="@+id/textView_line_1"
android:layout_below="@+id/textView_line_3"
android:text="@string/long_string" />
<TextView
android:id="@+id/textView_line_5"
android:layout_width="wrap_content"
android:layout_height="wrap_content"
android:layout_alignLeft="@+id/textView_line_1"
android:layout_below="@+id/textView_line_4"
android:text="@string/hello_friends" />
</RelativeLayout>
We covered res/layout/activity_main.xml and res/values/strings.xml previously and
we need to examine the res/layout/activity_main.xml and res/values/strings.xml and
what changes do we do that help with new TextViews.
We examine the followings:
android:id="@+id/textView_line_1"
@+id means add this resource to the app resources and it name or ID is TextView_line_1.
android:text="@string/hello_world"
The text for such resource is located in the String.xml file under the text id = "hellp_world".
The android:text can also be hardcoded as follows:
android:text=" Hello New Trainee - Welcome"
android:layout_alignLeft="@+id/textView_line_1"
alignLeft the same as the ="@+id/textView_line_1
android:layout_below="@+id/textView_line_1"
This set the TextView in the line below the resource listed in this case, it below texView_line_1.
Developing "Hello New Trainee - Welcome" app dynamically:
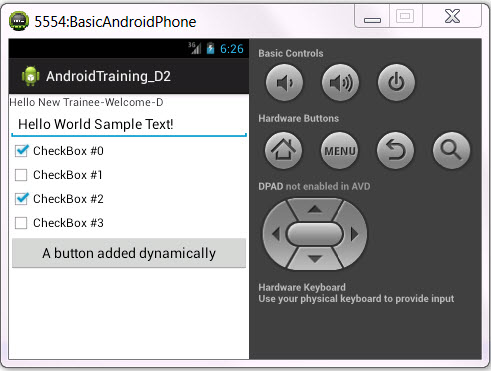
So far all our "Hello New Trainee - Welcome" app is done statically which means all the
texts, textfields were done in the xml files and our Sam_MainActivity class used the
setContentView(R.layout.activity_main);
As the app content view. To make our app Dynamic, means the Sam_MainActivity class has to do the work and the following app
AndroidTraining_D2 is our example of how to build an app dynamically.
|
�
|
Project:
AndroidTraining_D2
|
|
�
|
Package:
com.sameldin.androidtraining_D2
|
|
�
|
Activity Class:
Sam_MainActivity_D2
|
So we do not want to be redundant, therefore we need the readers to examine and compare the two apps AndroidTraining_1 and AndroidTraining_D2 look for the following:
Java code where AndroidTraining_D2 has more of Java GUI swing like code and the following GUI components are used:
|
|
ScrollView
|
myScrollView
|
= new ScrollView(this);
|
|
|
LinearLayout
|
myLinearLayout
|
= new LinearLayout(this);
|
|
|
TextView
|
myTextView
|
= new TextView(this);
|
|
|
EditText
|
myEditText
|
= new EditText(this);
|
|
|
CheckBox
|
localCheckBox
|
= new CheckBox(this);
|
|
|
Button
|
myButton
|
= new Button(this);
|
Compare the XML files and see that AndroidTraining_D2 XML files practically do not add any of the texts, strings, or layout
In conclusion, Java code performs the dynamic part of the app while the xml files performs the static one.
Sam_MainActivity_D2.java Class:
package com.example.androidtraining_d2;
import android.app.Activity;
import android.os.Bundle;
import android.widget.ScrollView;
import android.widget.LinearLayout;
import android.widget.Button;
import android.widget.TextView;
import android.widget.EditText;
import android.widget.CheckBox;
//===========No menu ===========
import android.view.Menu;
public class Sam_MainActivity_D2 extends Activity
{
@Override
protected void onCreate(Bundle savedInstanceState)
{
super.onCreate(savedInstanceState);
// comment the old code - default
// setContentView(R.layout.activity_sam__main_activity__d2);
// We did not use activity_sam__main_activity__d2,
// but we used: this.setContentView(myScrollView)
//=====================================
ScrollView myScrollView = new ScrollView(this);
LinearLayout myLinearLayout = new LinearLayout(this);
myLinearLayout.setOrientation(LinearLayout.VERTICAL);
myScrollView.addView(myLinearLayout);
//===========================================
TextView myTextView = new TextView(this);
myTextView.setText("Hello New Trainee-Welcome-D");
myLinearLayout.addView(myTextView);
//===========================================
EditText myEditText = new EditText(this);
myEditText.setText("Hello World Sample Text!");
myLinearLayout.addView(myEditText);
//===========================================
for(int count = 0; count < 4; count++)
{
CheckBox localCheckBox = new CheckBox(this);
localCheckBox.setText("CheckBox #" + count);
if(0 == (count%2))
{
localCheckBox.setChecked(true);
}
myLinearLayout.addView(localCheckBox);
}
//===========================================
Button myButton = new Button(this);
myButton.setText("A button added dynamically");
myLinearLayout.addView(myButton);
//===========================================
this.setContentView(myScrollView);
}
@Override
public boolean onCreateOptionsMenu(Menu menu)
{
// Inflate the menu; this adds items to the action bar if it is present.
getMenuInflater().inflate(R.menu.sam__main_activity__d2, menu);
return true;
}
}
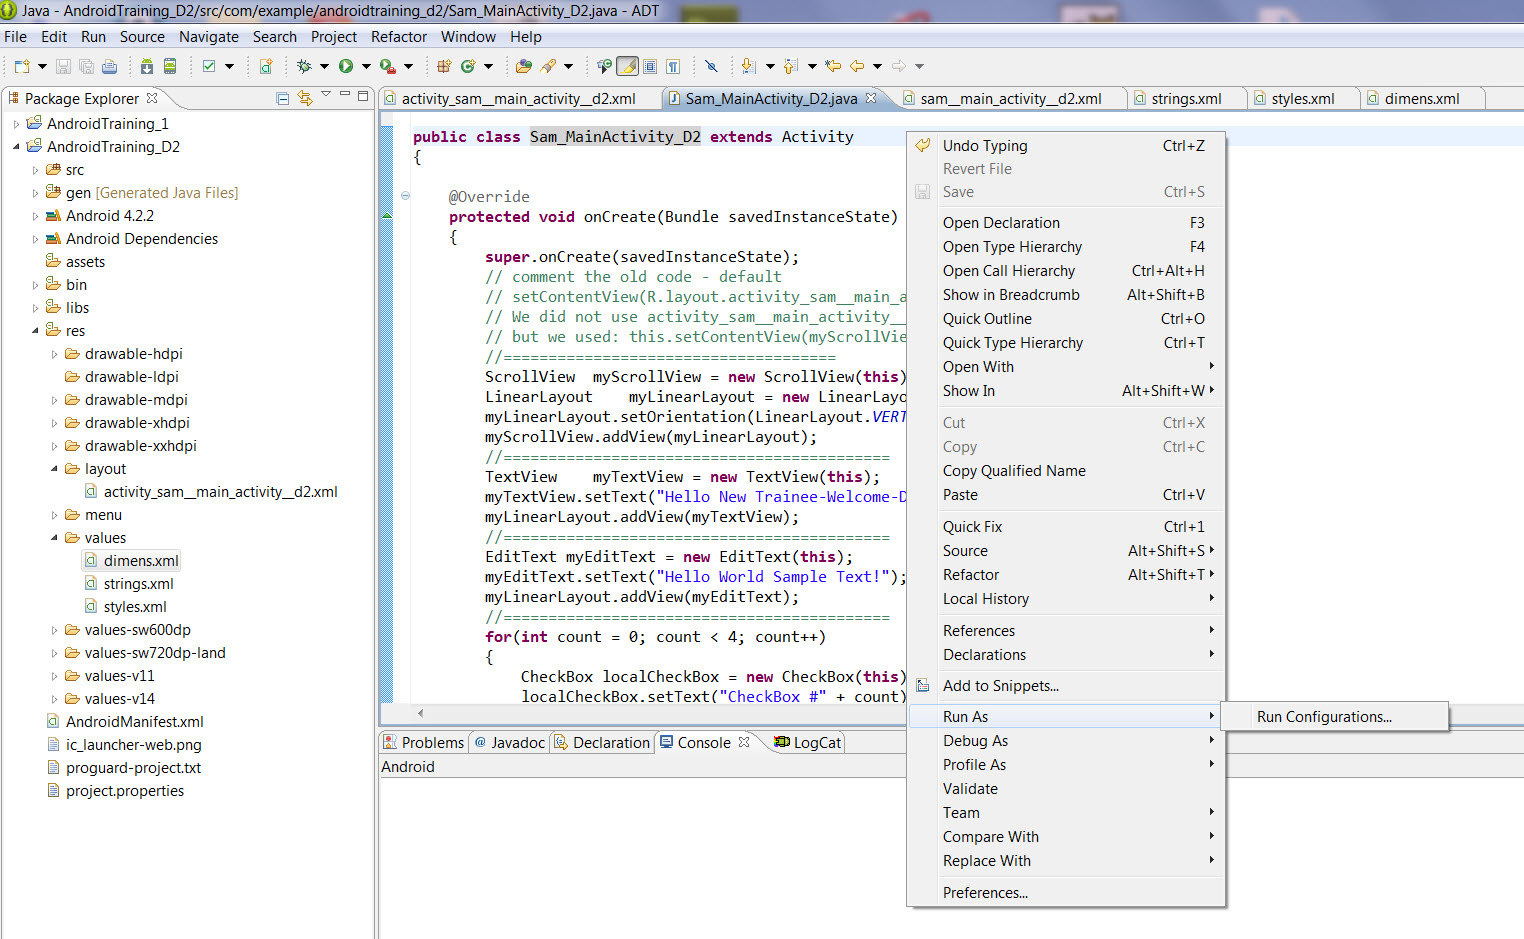
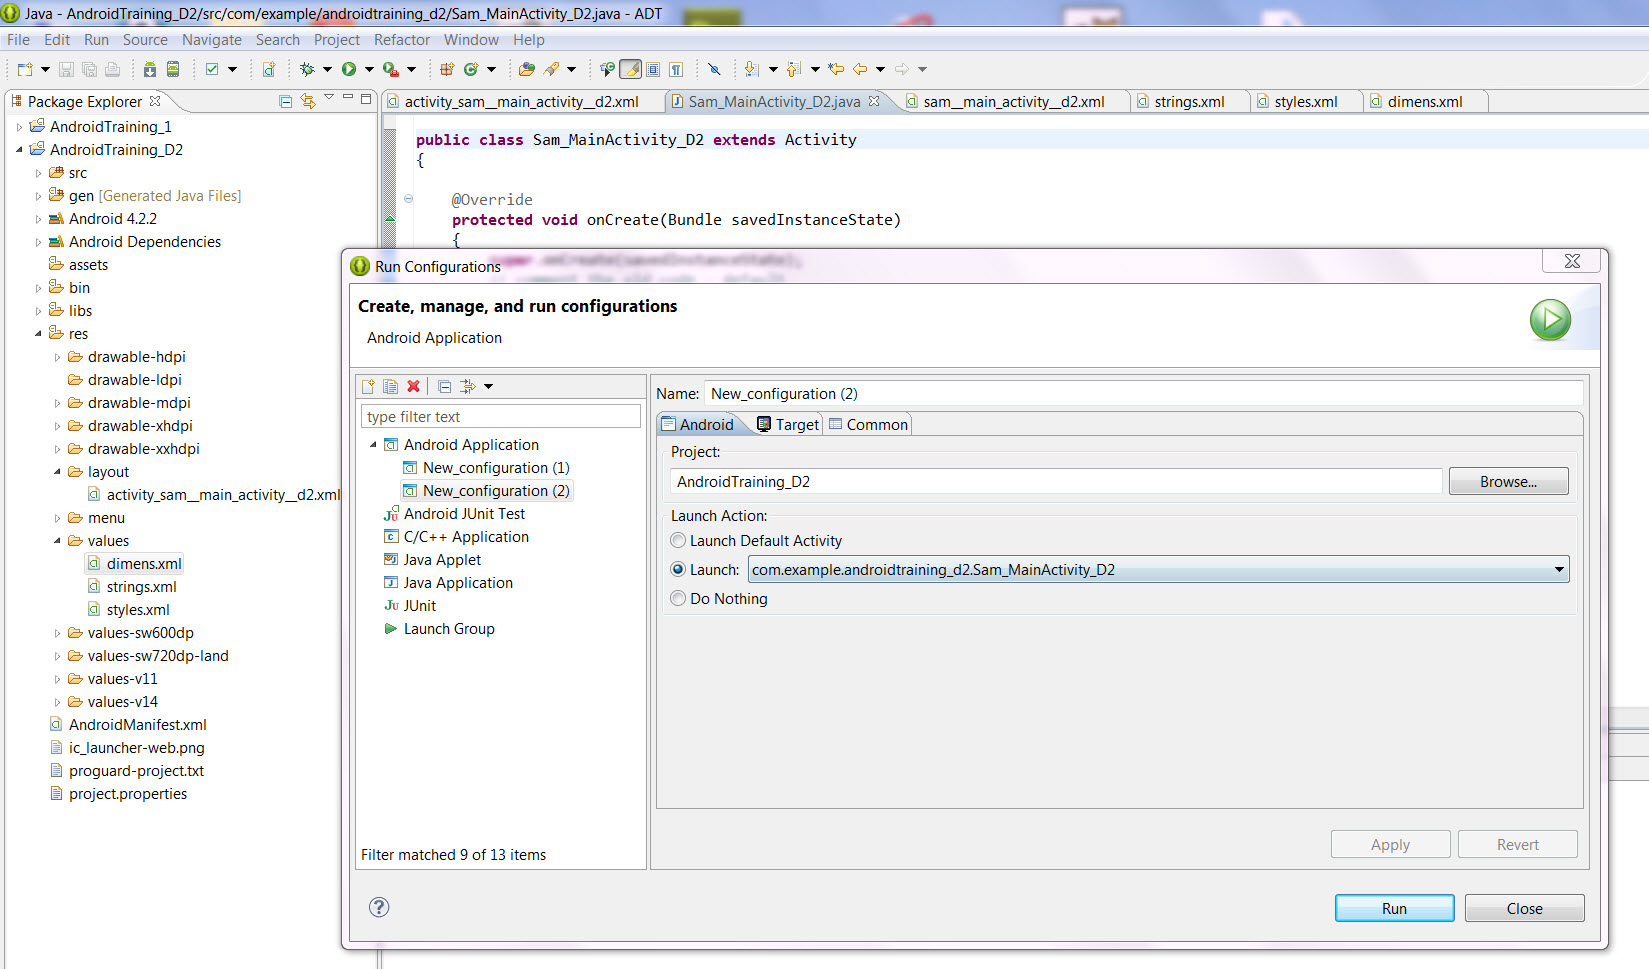
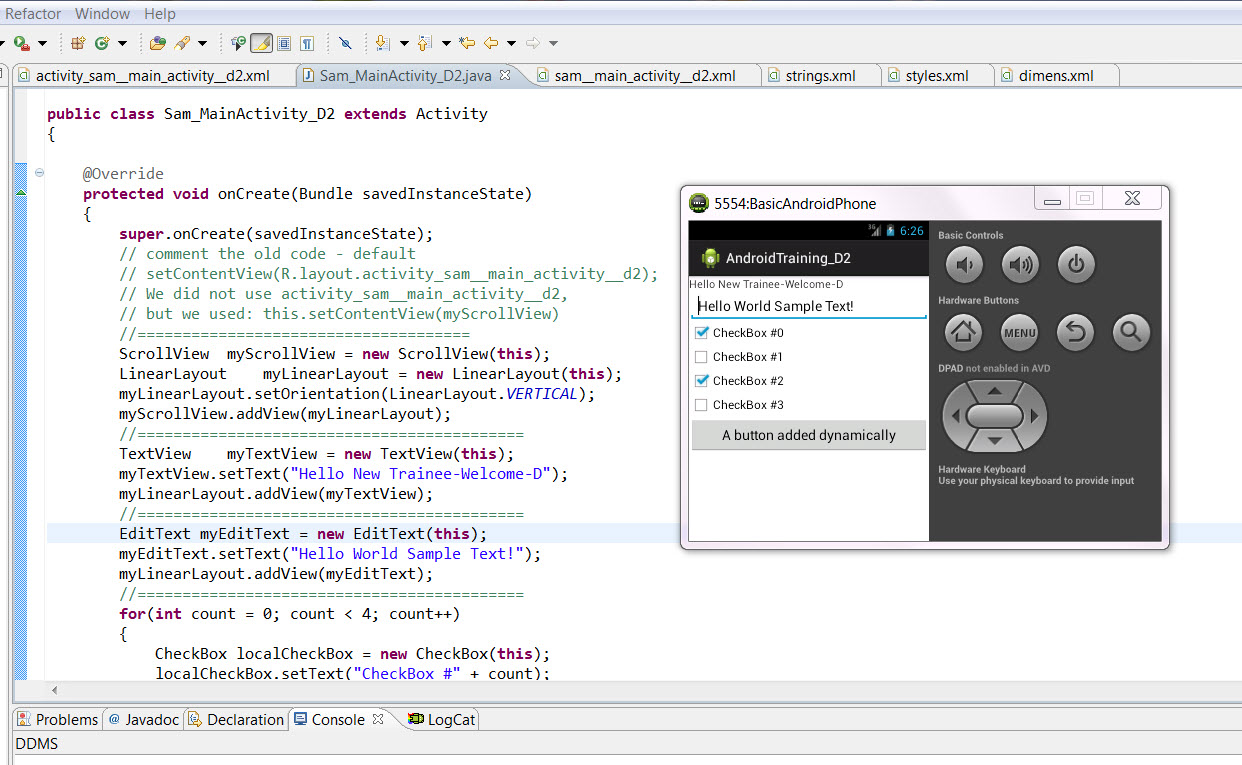
Now it is time to put the Java code into action and run the app on the Eclipse ADT.
The next images are basically running the AndroidTraining_D2 in the Eclipse ADT.
By right clicking of the mouse in the Sam_MainActivity_D2 class, then run the Configuration
by lunching the com.samledin.androidtraining_D2.Sam_MainActivity_D2 then the Android app
will run as shown in the running app images in the ADT.
 AndroidManifest.xml
:
<?xml version="1.0" encoding="utf-8"?>
<manifest xmlns:android="http://schemas.android.com/apk/res/android"
package="com.example.androidtraining_d2"
android:versionCode="1"
android:versionName="1.0" >
<uses-sdk
android:minSdkVersion="8"
android:targetSdkVersion="17" />
<application
android:allowBackup="true"
android:icon="@drawable/ic_launcher"
android:label="@string/app_name"
android:theme="@style/AppTheme" >
<activity
android:name="com.example.androidtraining_d2.Sam_MainActivity_D2"
android:label="@string/app_name" >
<intent-filter>
<action android:name="android.intent.action.MAIN" />
<category android:name="android.intent.category.LAUNCHER" />
</intent-filter>
</activity>
</application>
</manifest>
res/layout/activity_sam__main_activity__d2.xml:
<RelativeLayout xmlns:android="http://schemas.android.com/apk/res/android"
xmlns:tools="http://schemas.android.com/tools"
android:layout_width="match_parent"
android:layout_height="match_parent"
android:paddingBottom="@dimen/activity_vertical_margin"
android:paddingLeft="@dimen/activity_horizontal_margin"
android:paddingRight="@dimen/activity_horizontal_margin"
android:paddingTop="@dimen/activity_vertical_margin"
tools:context=".Sam_MainActivity_D2" >
<TextView
android:layout_width="wrap_content"
android:layout_height="wrap_content"
android:text="@string/hello_world" />
</RelativeLayout>
res/values/strings.xml:
<?xml version="1.0" encoding="utf-8"?>
<resources>
<string name="app_name">AndroidTraining_D2</string>
<string name="action_settings">Settings</string>
<string name="hello_world">Hello world!</string>
</resources>
uuuuuuuuuuuuuuuuuuu</RelativeLayout>
Under Construction - coming sooner